I Finally Finished a Side Project
TL;DR: I made a game and you can play it here:
After years of talking about releasing an app or a game and many failed attempts, I can finally say that I’ve done it. I’ve written this post to help anyone who has struggled to finish a project in the past, and included some resources that helped me along the way. Here’s how I approached the work and what I did differently to my past projects to ensure that I would complete it.
Learning from mistakes
I’ve abandoned many personal projects over the years, some before they even started. As a professional software engineer, the projects almost always involved building mobile apps that I’d be able to show off on the App Store, which would then boost my reputation and make it easier for me to get jobs that I thought I wanted and potentially even make some money on the side. Before I started working on this game, I tried to identify some reasons why I abandoned projects in the past:
- Too large in scope - it’s difficult to define exactly what “too large” means, but attempting to release a calendar + to-do list app that syncs between a phone, tablet and computer that customers enjoy using enough to regularly pay money for, feels in hindsight like more than I should have taken on while struggling to complete projects. On a project this large, I felt like there was no end in sight and decided that I needed to work on something that I could complete sooner.
- Lack of interest - After abandoning the calendar/to-do list project, I decided to build a habit tracker because I was feeling particularly lazy at the time and I wanted to fix that. It would help me keep on top of exercise, household chores and any other regular habits that I wanted to maintain. Once again, I knew there were plenty of other apps available that could help me achieve these goals but my real goal was to be able to show something off to employers and clients and it didn’t really matter what that was. I built a prototype that worked reasonably well and in theory I could have released it to gather feedback but I had already overcome my laziness without the app and I didn’t feel excited about working on it anymore. Building the prototype was only the beginning, there was plenty more work to be done to release and support it. There were already more than enough habit trackers in the App Store and didn’t want to invest any more of my spare time into a project I didn’t feel proud of. I decided to park the habit tracker project and find something that I’d enjoy working on.
![]()
- Unclear concept - Having learned from the loss of motivation that I felt during the habit tracker project, next time I wanted to work on something that I felt passionate enough about to complete it. I had always wanted to learn how to make games and I could see myself putting more effort into sharing a game that I thought people might enjoy playing. I’ve always been fascinated by our solar system and space in general. After visiting an exhibition about space exploration and advancements through history, I thought I’d build our solar system to scale in a 3D digital environment and that a game idea would naturally come to me in the process. I managed to make a working model of the planets in our solar system orbiting around a sun, however no game ideas were coming to me. At least none that were small enough in scope that I could see myself achieving them. I decided to park the work that I’d done and save it for when I had a better idea.

Having made each of these mistakes, I wanted to approach my next project differently. Even though I didn’t know where the solar system project was going, I was excited to continue practicing game development. This time I wanted to make sure that I began with a clear game design concept and a fixed scope that I could see myself completing. Around this time I was also feeling inspired after watching a video of a game developer’s process during a game jam and amazed by how much they achieved in a single weekend.
Game Jam Mentality
In a Game Jam, you have a limited time to develop a game, which usually follows a theme and is required to obey certain constraints. This felt like exactly the structure I needed to finally complete a side project. Having never made a game before, it seemed unrealistic for me do so for the first time with the time pressure of an actual game jam. However if I used a real game jam as a template for inspiration with a relaxed timeline, I would be able to learn the skills that I needed along the way. With enough practice following this process, maybe I could work my way up to entering a game jam for real.
The game jam that I sought inspiration from for this project was the Mini Jam 97: Simulation. The organisers instructed that every submission must follow the special condition; “movement is lethal”, which was open to interpretation. As soon as I read the condition I began brainstorming game ideas that would suit. I wanted the player to experience the feeling that if they moved when they weren’t supposed to, they would be penalised. I considered detecting movement with motion controls but decided to avoid that complexity in my first game. My first idea that felt achievable involved having certain buttons that the player needed to press and hold, and if they missed one or let go too early, there would be consequences. I chose to use a keyboard as my controller, since it offered at least 26 different buttons as controls and considered localisation to languages besides English as out of scope. I also wanted the game’s imagery to match the theme and imagined a character who was trying to balance in a single position without moving. With those ideas in mind, it was an obvious next step to have objects trying to distract the character or knock them off balance, and the player’s task was to prevent that from happening. The game jam’s constraints helped me to quickly come up with an idea, where an otherwise blank canvas gave me no specific problems to solve.
The game jam mentality also helped me to approach decision-making in a way that would always serve the goal of completing a game that was on-theme in the shortest time possible. For example, I knew that in a real game jam, I would hate to have worked for 48 hours to ultimately have nothing to submit, so it made sense to have a playable version of the game available as soon as possible. That meant that it didn’t matter how messy or organised my code was, until I had a working game. In the past I’ve agonised about keeping my code clean and scalable before I had achieved any results, but this time I would only start to care about the structure of the code if it was slowing me down and preventing me from reaching my goals. Approaching every decision this way meant that only the tasks that I felt really mattered to the player’s experience of the game were going to be worth my time.
Prototype
I made a prototype within a few days by using basic shapes and letters, no sound effects and no music. I needed to verify that the simplest form of the game was enjoyable and that it was worth the time that it would take to finish. Once I had built enough to test my concept, I played it myself to see if I found it fun. I also asked a few people to give me their feedback on how the game felt.
With helpful feedback about the timing and controls of the game, I was able to make large, impactful changes quickly, as there was nothing preventing me from revising my design. In addition to the subjective feedback that I was able to gather from the prototype, I also noticed a hardware limitation, in that no more than six keys could be pressed on my keyboard at the same time. A seventh key press was ignored and I intended to have at least 8 keys pressed simultaneously at the most difficult level of the game. I addressed this limitation by switching the “press and hold” mechanic of the game to a simple key press and even though that wasn’t quite as relevant to the “movement is lethal” limitation, it meant that the controls were no longer restricting the difficulty of the game. More importantly, feedback indicated that the change made the game more fun to play.

Learning new skills
With the prototype stage complete, I then continued to work towards a finished product. Since I hadn’t made a game before, there were a handful of new skills that I needed to pick up in the process.
Game design
Designing an experience for the player and having the ability to execute that design was a deliberate focus of mine during this project. I practiced this by thinking up-front about how I wanted the player to feel while playing the game and making decisions in service of that intention, a lesson that I’d learned from the Game Dev Field Guide Podcast.
The concept of having a character who was balancing because “movement is lethal” led me to choose a yoga Tree Pose as the illustration to communicate that intent. I also used the name as the working title for the game and never came up with anything that I preferred.
I wanted the music to initially complement the yogi who is balanced and breathing at a relaxed pace, and over time have it gradually intensify to complement the increasing difficulty of the game.
I teach the player how to play the game without getting in their way. I chose to display a visual cue only when the player seems confused which I consider to be when they haven’t pressed any keys in a while.
Resources that I found helpful for game design:
- The Art of Game Design by Jesse Schell
- Game Dev Field Guide Podcast by Zackavelli
- Video Games and the Human Condition by Jonathan Blow (as well as anything else by J. Blow)
Seeking and responding to feedback
Given I was designing an experience for others, I needed to validate that my assumptions were true by asking for feedback. In early prototypes I chose to set a lot of the context of how to play the game and what my vision was. Over time and with further development I gradually provided less context as the game was able to speak for itself.
Assuming positive intent and not taking negative feedback too personally has been something that I’ve found challenging in the past. This was a good chance to appreciate the opportunity to receive feedback that might improve my game. I found that it helped to be the one who was able to make the final judgement as it made me more open to hearing opinions that were intended to help me make the right call.
“I was doing well, then they all came flooding in 😆”
“artwork is good :) I like it… I’d like a leaderboard though”
“it’s great! love the animation”
While all feedback was helpful, no matter how small, multiple requests for a shared scoreboard led to me spending a few weeks to learn how to achieve that. It was not in my initial game design because it seemed more like an added bonus and I already had a list of those that was keeping separate until after I finished the basic gameplay. Once the basic gameplay was complete, I agreed that it was fun to beat your own high score and even more fun to beat some else’s.
Graphic design
I like pixel art and chose to utilise that art-style for this game out of personal interest. I wanted to learn more about the techniques that are used to achieve appealing results from a small number of pixels. Learning this would not only help me build the game but also give me a better understanding and appreciation for the style that I already enjoyed.
Aseprite is like Photoshop, but made intentionally for pixel artists. In addition to separating the canvas into layers, you can also draw on separate frames to create animations.
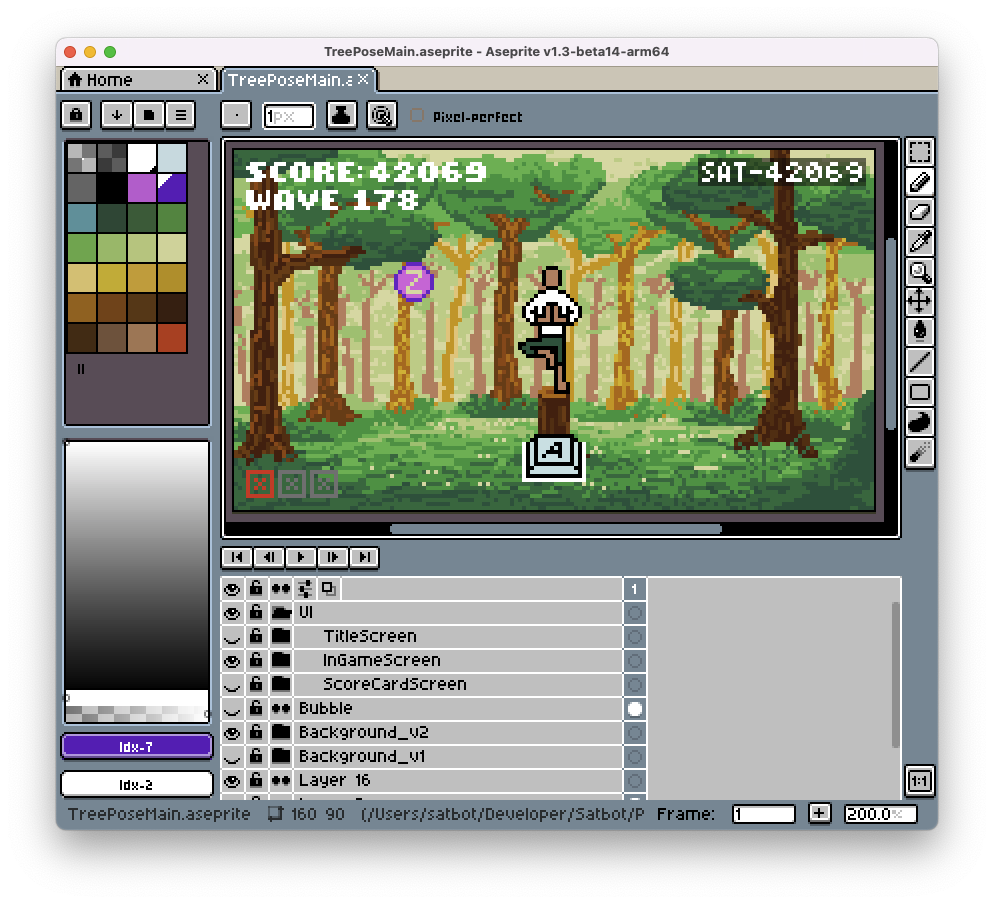

I made the fonts used in the game by drawing the characters in Aseprite and converting them to a font file using the Pixel Font Converter by YellowAfterlife. I then imported the fonts into Unity by following this guide.

Resources that I found helpful for pixel art:
Sound design
To make the music for the game, I borrowed a MIDI keyboard from a friend and decided to keep the learning curve simple by using Garageband. I was intimated by the complex user interface of other tools that I came across online, and decided to start with Garageband, changing only when my needs demanded it.
I was surprised and proud of myself when the sound matched the atmosphere that I was trying to create. I was also briefly disappointed and then found it hilarious when I realised a few days later that I had subconsciously stolen a melody from the 2008 song Akon - Right Now (Na Na Na), a song that I don’t think I’d heard in at least 5 years.
The bubble popping sound effects were recorded using my phone’s voice recorder app and my mouth, followed by editing in Audacity.
The penalty sound effect (when you hit the wrong key or get hit by a bubble) was made using Bfxr.
Resources that I found helpful for sound design:
- Learn music theory in half an hour by Andrew Huang
- How To Make Sound Effects for Games by Jonas Tyroller
Software engineering
I’ve been working as a professional software engineer for almost a decade now and in my experience, a large part of the job involves learning new tools and technologies that can help you solve the problems that you encounter.
Game Engine
I chose to use an existing game engine rather than program one from scratch. I’ll most likely learn how to do that when I have a need for it. While doing research online, the 3 engines that I was choosing between were Unity, Unreal and Godot. I chose Unity because of its support for programming in C# which I was already familiar with, as well as the large established community and wealth of resources online that I could lean on when I inevitably became stuck along the way.
I learned the basics of Unity using their own free Learning Pathways tutorials, by completing the “Essentials” and “Junior Programmer” courses. After understanding the basics, I experimented on my own and searched online to learn how to achieve the specific results that I wanted for my game.
Version Control
Having already used it for many years, I used git as a version control system. This made it very easy to experiment and revert changes where necessary, relieving any hesitation to try something that I hadn’t done before. Since git is best suited for basic text files, I also used Git Large File Storage to keep track of files such as images, audio and Aseprite projects.
Backend
Without much recent experience in backend development, I used the scoreboard feature as an opportunity to strengthen these skills. Since this is a small, hobby project there would be long stretches of time where the backend would be sitting idle, and I didn’t want to waste money running a server that wasn’t required. For that reason it made sense to use a scalable, serverless solution that would only charge me for the amount of data storage and computation that was being used. While there were plenty of services online offering this type of solution including Amazon Web Services (AWS), Microsoft Azure and Google Cloud to name a few, I was already aware of Serverless Stack and decided to use this as an opportunity to learn how to use it.
Serverless Stack is a convenient wrapper around AWS that makes it easy to define your backend infrastructure and logic using scripts that conveniently automate updates to your stack for you as you make changes. The final implementation of the scoreboard utilitised Serverless Stack to configure logic in AWS Lambda, storage in Amazon DynamoDB and public access via Amazon API Gateway.
Workflow
An awesome feature of Aseprite that helped me work efficiently was being able to extend its functionality by writing scripted workflows. For certain art assets in the game, I wanted a version for every letter of the alphabet. I drew the parts of the animation that were common to all letters on one layer and then made 26 more layers, one for each letter of the alphabet. After that I just needed to turn on one layer at a time and export the final product, however that was still a time-consuming process. Rather than spend the time clicking show/hide on layers manually to export the final files, I wrote a script that ran that process for me. This made it very easy to start with a rough drawing to test how well the animation worked in the context of the game, and then improve on the design of my artwork several times without being burdened by the labor-intensive work to export the files. The scripts are written in Lua and utilised the Aseprite API to interact with the software.

Reflection
When I reflect on the work that I’ve done I choose to ask myself, “what advice would I give my younger self and what will I try to remember or improve for future projects”.
One of the main things I’m able to take away from this project is a renewed sense of self-confidence. I encountered several challenges along the way and I’m now able to look back on them and use them as evidence for my own ability to make something that I feel proud of. Evidence of my abilities help keep the occasional feelings of imposter syndrome at bay and if that’s the only thing I take away from this work then it was worth the effort. This experience has encouraged me to continue to put myself in situations where I am challenged in the hope that I’ll continue to rise to the occasion.
By choosing to work on this project alone, I created an environment in which I was able to make all of the decisions and have full creative freedom to try my ideas without fear of failure. One day I may choose to work on a side project with a team, but for this project I felt free from the burden and frustration that I have associated with team processes in the past. During certain periods when the project was challenging, I also felt appreciation for the benefits of having a team to share the workload and was able to take that positive outlook into my team-based work. In future if I feel frustrated by the limitations of a certain environment, I will remind myself to consider the benefits and find ways to utilise them.
In a practical sense, I’m able to look back at this side project and say that I finished it by keeping the scope small and only putting energy into solving problems that would help me reach my goals. Part of successfully navigating problems that I encountered during this project was in identifying when I needed to change tactics and redesign in some way. One of the lessons that I’ve appreciated learning from The Game Dev Field Guide Podcast is that when prioritising the experience of a player, all decisions may be made by asking, “what emotion am I trying to evoke for the player and how will that be impacted by this decision?”. My effort was put into work that would be noticeable to the player, such as gameplay, animation and music, instead of stressing about code structure that was only visible to me. At the same time, I improved the code structure as soon as I felt it was a burden on my ability to serve the player.
In the handful of cases where I needed to learn a new skill in order to proceed with development, I approached it with a mindset that there was no way I would be perfect from the start. There would be nothing to improve on unless I treated myself as a beginner and delivered something basic to start. More often that not, I found that a basic result was more than enough for this project, and that I’ll have plenty of time to improve on my skills later on. Looking back on everything that I learned for this project also gives me confidence that I can do the same again, even in an environment where I may have deadlines or other pressure that I previously would have been hesitant to accept.
Since I was prioritising the player’s experience for this project, I didn’t bother seeking feedback on my code or the structure of my Unity Project. Instead I shared a playable demo of the game and asked for direct feedback on that alone. In future projects I will continue to share a working version of the product as early as possible, adding more layers of polish to it only when I feel that the foundation serves its purpose. Even though it’s difficult to explicitly define what makes something fun, I found it was easy for others to describe to me which aspects of the game were challenging, confusing, annoying or exciting. Aiming to maximise the fun in my game was a more enjoyable experience for me as a developer when compared to building consumer or enterprise applications for businesses that are often optimising for code cleanliness or profitability.
Sharing my work and what I’ve learned
I’m sharing this game and this blog post for 3 main reasons:
- I want to continue to learn and improve by receiving feedback on my work. In addition to sharing the game, sharing my thought process through this post is how I hope to accelerate my growth in problem solving as well as communication. For that reason I encourage you to reach out and tell me what you thought of anything that I’ve shared.
- I want to help others who may be struggling with the same challenges that I’ve faced in the past and during this project. By sharing my example, I hope to be helpful in the way that the various resources I used along the way helped me reach this point.
- I want recognition for what I’ve achieved by sharing it publicly and adding to my online portfolio, with the hope that it will reflect positively on me and create future opportunities.
What’s next?
This experience has shown me that I much preferred building a game as a side project over building an app, so I plan to make another game. I want to try something different, involving some player movement, level design and perhaps even a narrative. I plan to continue developing the skills that I’ve picked up during this project and hopefully receive feedback that will help me do an even better job next time.
Support
If you enjoyed playing the game or reading this post and would like to help me on my journey to doing this sort of thing full time, please consider supporting me by buying me a coffee ☕️. Its early days and I’ve got a long way to go, so even if you can’t spare any coin, I appreciate you playing the game and reading this post.